How To Get A Database Restore History In SQL Server

Getting the restore information from the MSDB database is one of the most important concepts that a DBA should be aware of. The concept can come in handy when you must check for restore history and tracking purposes.

The restore information can be queried by connecting to the MSDB database. It can be useful to check some most important data like the last restore date, database name, username, and backup type.

Restorehistory

SELECT 
[restore_date]
,[destination_database_name]
,[user_name]
,[backup_set_id]
,[restore_type]
,[replace]
,[recovery]
,[restart]
FROM [msdb].[dbo].[restorehistory]

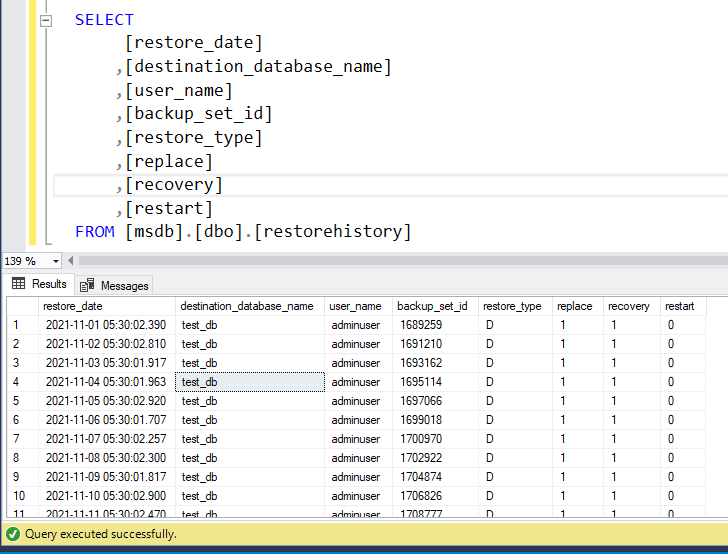
Restore History SQL Server

The information we gather from the restorehistory table are:

Restore_date: Specifies the restore date of the database.

Destination_database_name: Specifies the destination database name.

User_name: Specifies the name of the user who performed the respective database restore.

Backup_set_id: Specifies the ID that can be joined with the backupset table to get more information about the backup file.

Restore_type: Specifies the type of restore that the respective database was carried out. D (Database),  I (Differential), L (Log), and V (Verifyonly).

Replace: Specifies the option to replace the destination database. 1 (was specified with replace option), 0 (was specified without replace option).

Recovery: Specifies if the restore was done with a recovery or norecovery option for the database.

Restart: Specifies whether the RESTART option was applied or not.

Restorehistory and Restorefile

The information we gather from the restorefile table is:

Destination_phys_name: Specifies the complete physical file path that was used during the restore.

select a.[restore_date]
,a.[destination_database_name]
,a.[user_name]
,a.[backup_set_id]
,a.[restore_type]
,a.[replace]
,a.[recovery]
,a.[restart]
,b.destination_phys_name
from [restorehistory] a
inner join [restorefile] b
on
a.restore_history_id=b.restore_history_id

Restore History SQL Server


Restorehistory, Restorefile, and Restorefilegroup

A restore of filegroup as well can be performed during a restore in SQL Server. If you wish to restore a specific filegroup by avoiding the rest, then we can do so by using the filegroup option.

The information we gather from the restorefilegroup table is:

Filegroup_name: Specifies the name of the filegroup with which the restoration was carried out. 

select a.[restore_date]
,a.[destination_database_name]
,a.[user_name]
,a.[backup_set_id]
,a.[restore_type]
,a.[replace]
,a.[recovery]
,a.[restart]
,b.destination_phys_name from [restorehistory] a
inner join [restorefile] b
on
a.restore_history_id=b.restore_history_id
inner join [restorefilegroup] c
on
a.restore_history_id=c.restore_history_id

Restore History SQL Server 3


You may also refer: Restore The Master Database In SQL Server
What Is Common Table Expressions (CTE) In SQL Server

What Is Common Table Expressions (CTE) In SQL Server

The Common Table Expression is a table expression that most database developers and DBAs work on. The CTE was first introduced in SQL Server 2005. The main intent of the introduction was to ease the developers with the result sets. Let’s take a look at the details of the CTE.

What is a Common Table Expression?

The Common Table Expressions (CTEs) are a temporary result set. It is another standard form of table expression very similar to derived tables. Additionally, Common Table Expressions are represented in short form as CTE. While considering the CTEs, there comes a bundle of more advantages over the standard table expressions.

The inner query defined in the CTE must always follow all the requirements of SELECT from your table to be valid to define a table expression.

Syntax of a CTE:

Every CTE has a WITH statement and has the below general format.

WITH <Your CTE Name>[<target_Column_list>]
AS
(
<inner_query_defining_CTE>
)
<outer_query_against_CTE>;

Example:

with CTE1 as
(
select * from sys.databases
)
select name from CTE1;

Assigning Column Aliases in CTEs

There are two forms of column aliases, inline and external.

Inline Alias: Specify column alias <column_alias> right after the expression <expression>.

Example:

with CTE1 as
(
select name, database_id as InternalAlias from sys.databases
)
select name from CTE1;

External Alias: Specify column alias <column_alias> right after the CTE name in the parentheses.

Example:

with CTE1(External_Alias, ID) as
(
select name, database_id as ID from sys.databases
)
select External_Alias, ID from CTE1;

Using Arguments in CTE

Like most database developers and administrators are much familiar with using the parameters and arguments while writing the query, the similar applies to CTE too. You can use arguments inside CTE.

Example:

declare @DB_ID int=1;
with CTE1(External_Alias, ID) as
(
select name, database_id as ID from sys.databases where database_id=@DB_ID
)
select External_Alias, ID from CTE1;

Defining Multiple CTEs

The option of defining multiple CTEs comes with a great advantage. And one of them is to avoid the query nesting that usually happens with the derived tables.

Example:

with CTE1(External_Alias, ID) as
(
select name, database_id as ID from sys.databases
),
CTE2 AS
(
Select name as database_name from sys.databases
)
select CTE1.External_Alias, CTE1.ID, CTE2.database_name from CTE1
inner join
CTE2
on
CTE1.External_Alias=CTE2.database_name;

Multiple References in CTEs

In most cases, we tend to reference the CTE only once. But we can have multiple references to the same CTE and it comes with added advantages. Defining a single CTE and referencing the same CTE multiple times from the FROM clause of the outer query avoids multiple derivatives from the user tables.

This approach significantly increases the performance as it is considered a “modular approach” verse the “derived tables”.

Example:

with CTE1 as
(
select name, database_id as ID from sys.databases
)
select a.name, b.ID from CTE1 a
left outer join CTE1 b
on
a.ID=b.ID;

From our example, we have declared just one CTE by the name CTE1 and referenced the CTE1 twice in the outer FROM clause. This is logically equivalent to deriving the data from two different derived tables. Additionally, this approach can give us a clearer picture and lessen the errors. 

REDO_THREAD_PENDING_WORK Wait Type In SQL Server

REDO_THREAD_PENDING_WORK is an AlwaysOn High Availability Wait Type which is without a HADR_ prefix. In most cases, this wait type can be ignored as they are not very important to be noticed. But it is good for all the DBAs to immediately identify the wait types being generated in the SQL Server Instance.

What is REDO_THREAD_PENDING_WORK?

Inside an AlwaysOn Availability Group, the REDO_THREAD_PENDING_WORK wait type occurs on the secondary replica. Further, a wait type accumulates over a course of time in the server when there is no work to be carried out. As we all are much aware that an AlwaysOn Availability Group processes log records, hardens them on transaction logs, and then confirms the same to the primary replica. While using the synchronous mode, the primary replica waits to commit on the client until a transaction commits in the secondary replica. Whereas, in the asynchronous mode, the commit message is sent to the client without waiting for hardening on the secondary replica.

Until now, we have seen the internals of an AlwaysOn High Availability for a synchronous and asynchronous mode. The REDO_THREAD_PENDING_WORK wait type comes to the picture when there are any modifications inside the secondary replica log records. The REDO thread does not impact the commit confirmation from the secondary replica. Furthermore, this states that the secondary replica transactions may not the exact same as the primary replica even after the transactions are committed on both sides.

At this point, you might think that the information could be lost during a failure. However, you must note a point that all the information will be recorded in the secondary replica logs. The Secondary replica will have all the information it requires to perform in the secondary replica log files. In case of a failure, the SQL Server will either redo or undo the internal processes from the transaction log.

REDO THREAD PENDING WORK Wait Type SQL Server


How to check the REDO_THREAD_PENDING_WORK wait type in Secondary Replica?

The wait type occurs in secondary replica because of accumulated wait time naturally. This can be monitored using a DMV called sys.dm_os_wait_stats. This DMV can be used to fetch the waiting_tasks_count, wait_time, max_wait_time, and signal_wait_time. All the durations mentioned from the DMV will be in milliseconds.

select * from sys.dm_os_wait_stats where wait_type='REDO_THREAD_PENDING_WORK'

REDO THREAD PENDING WORK Wait Type SQL Server


Note: In most cases, this wait type can be ignored. 

Restore The Master Database In SQL Server

There are multiple reasons you may want the master database to be restored. While a DBA understands clearly the backup strategies, the backup of the master database is very critical. In most cases, restoring the master database will be a rare scenario. However, including all the system databases in our regular backup strategy is a must.

Restoring a master database is not a straight method like any other normal backup restore we perform. As the name suggests, the master database bags all the information about the server including databases, database files, and locations, configuration settings, login information, and more.

Being said that the master database in most cases is rare, it is always recommended for the DBAs to keep the restore process handy. Any of our databases at any moment can fall and is the best option to make a practice of disaster recovery.

Let’s look at the steps to restore the master database.

1. Start SQL Server Instance In Single Mode

Follow the path for starting SQL Server Instance in Single User Mode.

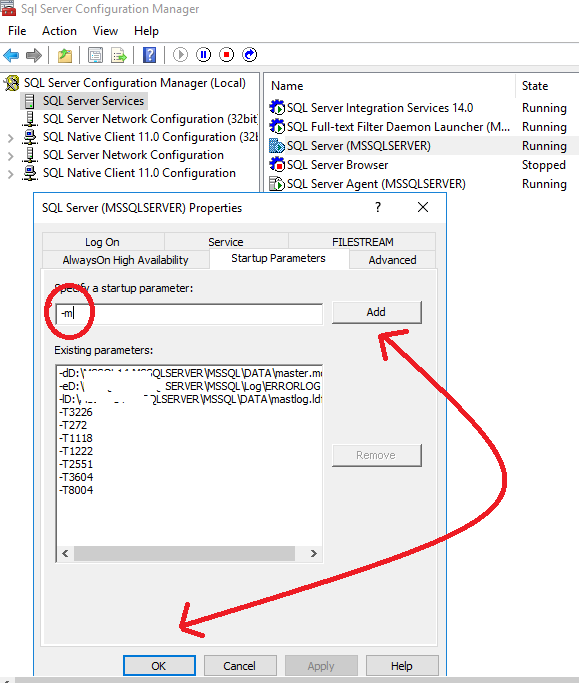
SQL Server Configuration Manager --> Click on SQL Server Services --> Click on Startup Parameter Option --> Type “-m” in the specified field --> Click on Add --> OK

Restore Master Database SQL Server


By doing this, the SQL Server Instance will be set to Single User Mode. Now, restart the SQL Server Services to get the effects in place.

2. Open Command Prompt To Restore Master Database

Open the command prompt and type >sqlcmd. This will navigate to enter the SQL commands. 

 RESTORE DATABASE master FROM DISK = 'C:\BackupRestore\master.bak' WITH REPLACE;

Restore Master Database SQL Server


3. Remove “-m” Startup Parameter From SQL Server Configuration Manager

Sometimes we may be in a hurry to fix it and may forget to revert the startup parameter. Once the master database is restored, the SQL Server shuts down and terminates the sqlcmd process. Once the restart has been finished, before you open the SQL Server Instance, revert to multi-user mode by removing the startup parameter. 

Please refer to the MSDN HERE for more details.